Guide For Affordable Airtight Retrofits: Membranes, Methods & More
Guide For Affordable Airtight Retrofits: Membranes, Methods & More
If you’re a contractor or a home-owner looking to retrofit an older house to more modern energy efficient standards, then you know how difficult and expensive retrofits can get. In this guide we’ll go over cost-effective ways to make a retrofit more airtight.
No matter how much insulation you pack into the walls and loft during a retrofit, if all the warm air is escaping at the same rate as it was before you will not see that much of an improvement.
That’s why we’re looking to demystify airtightness and help people understand the products and methods to execute airtight upgrades cost-effectively.
Brief Intro To Airtightness
Brief Intro To Airtightness
Let’s quickly cover what is airtightness. An airtight building is one which uses airtight materials and methods to stop warm air from leaving and cold air from entering.
Air Changes Per Hour
Airtightness is measured in air changes per hour, which denotes how often the volume of air in the house gets replaced. Let’s imagine a hollow cube with a volume of 1m3. We can cut some relatively large holes into this cube and perform an airtightness test on it.
The results of this theoretical cube would be as poor as 40 air changes per hour, meaning the entire volume of the cube is replaced every few minutes by new air. If you’re trying to heat the air it’s incredibly inefficient!
Were this a house, you’d need to reheat all the air inside the building every few minutes.
If we were to cover the holes in the cube, we would have an airtight box that loses far less air and makes insulation and heating far more efficient.
Airtightness Standards
This directly applies to any retrofit, older houses often have terrible airtightness results and for any energy-efficient house 4 air changes per hour is considered good, while 0.6 or less would be the requirement for passive buildings.
When outlining a plan for your retrofit and making a building more energy efficient, airtightness and ventilation are crucial considerations. It’s worth having an airtightness goal in mind even if you won’t be performing an airtightness test.
Making Your Retrofit Airtight
Making Your Retrofit Airtight
Let’s cover the different important aspects of airtightness you need to keep in mind when retrofitting an older property.
Walls
When you’re first planning out your retrofit the first consideration is the make-up of the walls which will determine your approach to your airtight layer. We’ll be focusing on the two broad categories of build you might have.
Timber-Frame Walls
Timber-frame walls are not airtight and can result in tons of unwanted air leakage.
A major concern with timber frame is ensuring proper moisture control. Timber-frames feature a weathertight membrane on the exterior called a breather membrane. This membrane serves two functions as the waterproof, windproof and UV-resistant layer protecting the envelope of the house and a critical second function allowing the envelope to breathe.
The second part of your wall is the internal airtight layer. This consists of an airtight membrane which serves two functions, to create an airtight seal to prevent warm air from leaving and to control moisture inside the building.
If you have timber-frame walls and are planning to reach a good level of airtightness you’ll need to create an airtight envelope stretching from your floor to your ceiling or loft.
To create this envelope, you’ll need to run an airtight membrane across your walls to prevent air leakage alongside sealing any penetrations in that envelope such as cables, ducts, piping and windows.
Blockwork Walls
Thick blockwork walls are generally airtight. This means that blockwork houses do not require a membrane be laid on the walls, however this isn’t always the case. If your blockwork isn’t airtight you would need to lay a variable SD membrane across the walls, just like in a timber-frame.
Sealing & Fixing Airtight Membranes
For any retrofit project if a membrane is needed, it’s always recommended to use a variable SD membrane . Variable SD membranes have a dynamic SD value that allows them to adapt their moisture control to the environment. These membranes are more expensive than fixed SD value membranes but they are needed to deal with historic moisture in the building envelope to prevent any issues popping up in the future.
This airtight layer can be placed anywhere after the insulation in the external walls of the building, right behind the plasterboard or fixed onto battens or joists.
The airtight membrane is fixed using either staples or double-sided tape. Double sided tape is preferable as it does not create any penetrations in the envelope. When using staples, you have to use airtight tape to seal the staple to prevent unwanted airleaks.
Products For Retrofitting Timber-Frame Walls
- PHS Variable Plus – Membrane used to create an airtight envelope
- PHS Argo Plus – Jointing tape used to seal penetrations and overlaps in the membrane.
- PHS Double Sided Tape – Used to fix membrane in place without penetrating the airtight envelope.
Products For Retrofitting Masonry Walls
- PHS Variable Plus – Membrane used to create an airtight envelope
- PHS Argo Plus – Jointing tape used to seal penetrations and overlaps in the membrane.
- Gerband Fortax Sealant – Sealant used to adhere membranes to blockwork.
- Gerband Primer – Used to prime the blockwork prior to sealant application to ensure a long-lasting seal.
Sealing Penetration In External Walls
You also must seal any penetrations in the walls, such as piping going through the external walls. You need to internally seal the gaps created by pipes, ducts and cable. if your sealing pipes that get hot it’s required to use aluminium heat-resistant tape.
Products For Sealing Holes In The Envelope
- PHS Downlight Hoods – Used to seal ceiling lights to prevent a gap in the airtight envelope
- PHS Modbau –Airtight tape used internally to seal around penetrations such as piping and cables.
- Gerband Primer – Used to prime blockwork to ensure long lasting seal
- PHS Reflecta/ Gerband 712 – Aluminium heat-resistant tape used for ducting & Piping
Retrofitting Floors
Retrofitting Floors
Most modern builds have concrete floors that are airtight, the junctions between the walls and floor sometimes might need sealing, but the floor itself is airtight.
In older builds, it’s very common to see a suspended timber floor. These floors are not airtight, and they generally feature an empty ventilated space below. This type of floor is far from ideal and often leads to drafts and severe air leaks. Cold air enters the space under the floor and into the house, pushing warm air out.
Just stuffing the floor with insulation doesn’t stop the cold air from entering and the insulation itself is not very effective as vapour from the outside seeps into it and lowers the impact of the insulation overtime.
The best method to retrofit this type of floor is by using a high-performance variable membrane.
This is done by weaving a high-performance scrim-reinforced membrane across the bottom of the joists and cover the overlaps with an airtight tape. Then packing your insulation on top and fixing floorboards.

The membrane you select should have a very high sd-variance of around 0.4-35m to dynamically control the moisture and ensure no condensation happens within the floor envelope. If you plan to put in heavier insulation, such as loose-fill cellulose, you will need to use a scrim-reinforced membrane that is strong enough to hold very dense and heavy insulation in place.
Products For Suspended Floor Construction
- PHS Variable Plus – Membrane used as the airtight and breathable layer
- PHS Argo Plus – Joining Tape to seal overlaps and penetrations
- Gerband 6400 Sealant – Used to seal the membrane on the edge to the wall
- PHS Spray Primer – Used to prime the surface for the sealant to ensure long lasting seal
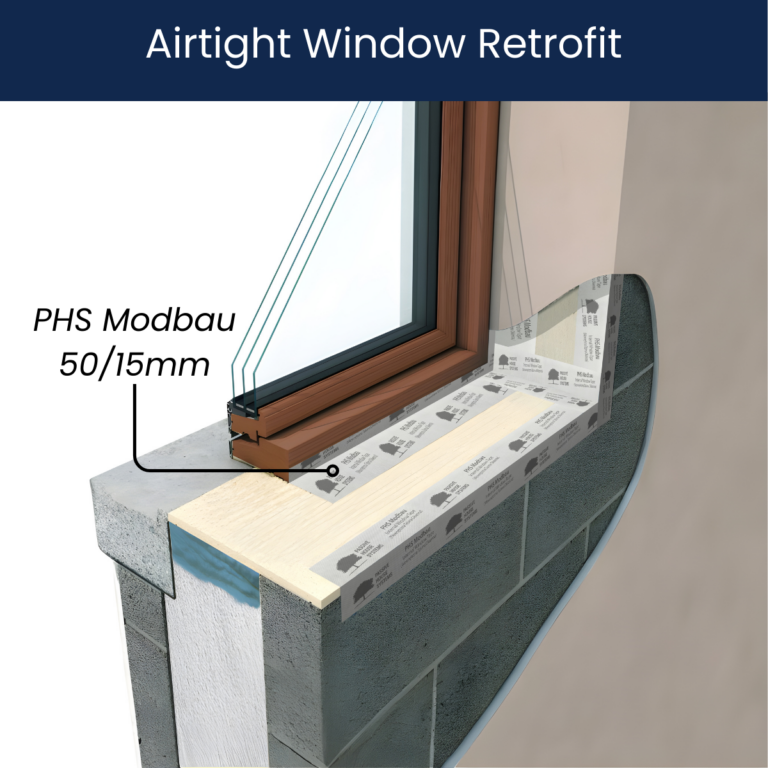
Windows & Doors
Sealing windows and doors is crucial in making sure your build is reasonably airtight. Airleaks around the unsealed gaps around the windows can be responsible for up to 30% of a houses air leakage. There’s no point installing dense insulation and having thicker walls when all that efficiency is lost to windows.
It’s common for installer to use silicone or foam to seal these gaps but these are not long-term solutions and they will degrade overtime letting more and more air through. Foam should be used in combination with airtight tape to ensure an efficient, long-lasting upgrade.
Luckily properly sealing windows is relatively straightforward.
For blockwork builds you need to use suitable airtight masonry tape that will bond to the blockwork for the lifespan of the building, such as PHS Modbau which also features a split-release for easy application. You prime the blockwork around the frame using a PHS Primer tub and apply the tape.
Modbau tape can be plastered and painted over once it’s fixed in place.
We have an installation video covering window tape for block builds.
Installation Videos – Specialists in Renewable Energy Building Systems | Passive House Systems UK
When working on a timberframe you still can use masonry tapes like Modbau or you can use timber frame window tapes like PHS Split-Release. The method is the same except that the vapour barrier used for the airtight envelope needs to be fitted underneath the tape to ensure a complete airtight envelope.
Products For Timber-frame window sealing.
- PHS Split Release Tape – Airtight Window Tape
- PHS Spray Foam – Used for sealing
Products For Blockwork Window Sealing
- Gerband 6300 Fortax Sealant – For sealing membrane to the edges of the masonry wall.
- PHS Primer – For priming blockwork to ensure long lasting seal
- PHS Modbau – Window tape for masonry
- PHS Spray Foam – Used for sealing
Loft & Ceiling
The final consideration we will cover is one of the most important ones. The loft / ceiling is one of the major sources of air leaks in older houses. Warm air rises so as you heat your home all that warm air leaves the livable envelope and either into your loft or out of your house.
If you want your home to have a reasonable standard of airtightness you will need an airtight membrane covering your loft or ceiling and you’ll have to pick the right membrane and the correct place to fit it.
Let’s cover the first question. Where do you place your membrane?
When you have a livable loft then you would need to extend the airtight envelope into the loft itself. With a timberframe build your membrane would stretch from the ground floor to the rafters of the loft and the apex creating a full airtight envelope while in a blockwork build you only need to ensure a full airtight envelope in the loft using a Variable SD Membrane.
If your loft is not livable you would place your airtight membrane on the ceiling of your top floor above the plasterboard.
Products For Retrofitting loft / ceiling.
- PHS Variable Plus – Membrane used as the airtight layer
- Argo Plus – Joining tape for overlaps & penetrations
- PHS Double Sided Tape – For fixing membrane
Products For Blockwork
- Gerband 6300 Fortax Sealant – For Sealing membrane to the edges of the masonry wall.
- PHS Primer – For priming blockwork for sealant to ensure long lasting seal
By the end you will have a building with an airtight envelope all around the livable area of the house resulting in massively improved energy efficiency as warm air is no longer leaving the house.
Most of this work can be done DIY. Tools and machinery is not required to make your floor, loft and windows airtight, in the end fully retrofitting a house to be airtight is not as expensive as you might initially think.
The improvements from making your home airtight can be gigantic, retrofitting a regular older home to passive house standards would lead to a 90% reduction in energy usage per m2 but most retrofits don’t go that far, even just properly sealing windows, floors and lofts can lead to 50% reductions in your energy usage. This makes airtightness one of the most cost-effective methods of lowering your bills.
If you’re working on a retrofit project and want to make it airtight, but you are unsure what products or installations methods to use. You can reach to our team of world class team of technical experts to help.